|
|
Post by paws on Jan 11, 2005 7:36:01 GMT -8
Pooky, Your welcome, and Lpn, Thanx!
|
|
|
|
Post by gracie on Jan 12, 2005 11:49:23 GMT -8
dus he still hav his bubble barn?
|
|
|
|
Post by paws on Jan 13, 2005 3:32:24 GMT -8
yu-up
|
|
|
|
Post by gracie on Jan 13, 2005 12:08:53 GMT -8
in his regular cage or in the duna?
|
|
|
|
Post by minnesota2121 on Jan 13, 2005 14:48:20 GMT -8
Paws,
That Bubble Barn was such a great idea! ;D I decided to try to make something like that ( I think, because I can't see the whole thing in your pic.) and it is soo cool! thanks for the idea! I will try to post a pic!
|
|
|
|
Post by minnesota2121 on Jan 13, 2005 15:10:00 GMT -8
This is my creation. I decided that I needed to make the cage bigger becauseI now have 3 gerbils and I found out that a 10-gallon tank is only big enough for 2 gerbils. I thought I would need to buy a new tank, but when I saw Paws' idea, I decided to try to make it (but I put it in a second level to my tank), so here it is! ;D  The whole Gerbil House(with TWO levels!)  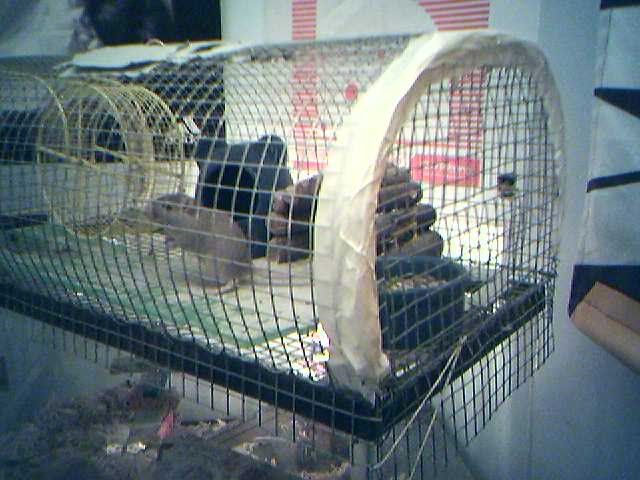 Side view (With Smoky looking at me...) 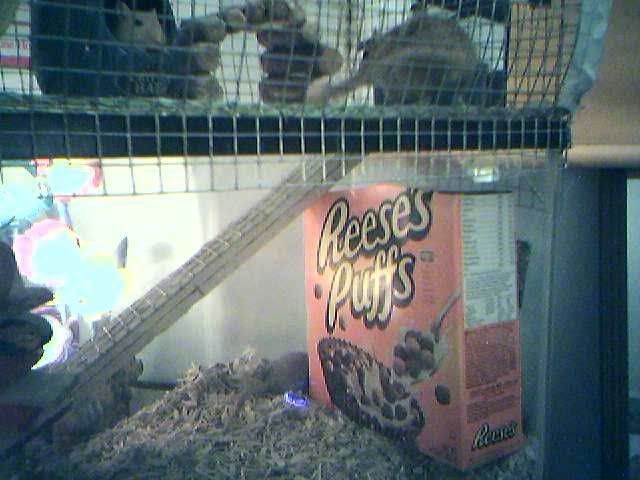 Bottom, with the ramp that they climb up to get to the top. Plus a cereal box.....Their Favorite!!! 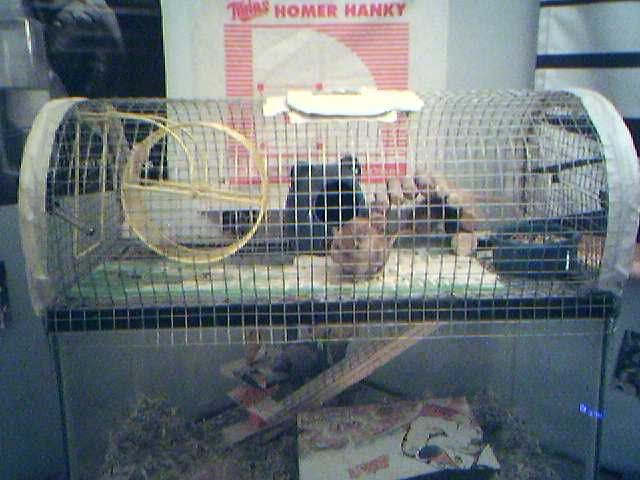 Closer view, with Buddy enjoying the extra space! |
|
|
|
Post by pooky on Jan 13, 2005 18:39:06 GMT -8
love your pics ;D do you use duct tape to hold it together? if so, do they chew on it?
|
|
|
|
Post by minnesota2121 on Jan 13, 2005 20:45:50 GMT -8
No, what i did was I lined up the two parts and then I took some thin wire and weaved it in between each hole. This was very strong and it would be impossible to pull apart. It took a long time though. It was kind of like sewing the two parts together but with a thin wire instead of thread. I just used the duct tape on the outside of the cage so that I don't cut myself, because the outside edges are kind of sharp. The inside is not sharp at all. The whole thing took me about four hours to make. Glad you liked it. Are you going to try to make it, because if you are I would be glad to give you some tips.
|
|
|
|
Post by lpn1993 on Jan 14, 2005 3:59:51 GMT -8
I love this idea, and I want to make one of these!! Petsmart has a condo thing for putting on top of a 10-gallon tank, but they want a ridiculous price for it. If I could make my own, that would be great! I'd love to hear any tips or suggestions that you have.
Thanks!
|
|
|
|
Post by paws on Jan 14, 2005 7:14:51 GMT -8
1 Wine Box (my dad's ;D)
1 roll of wire
Pull off one end of the wine box and make the bubble on the other end.
Minnesota, That's cool!
|
|
|
|
Post by minnesota2121 on Jan 14, 2005 16:05:25 GMT -8
Glad you guys like it!
This is how I made my upper level to my gerbils' tank ;D
Some tips I would have is to use the wire that comes on a roll. I bought mine at a Home Depot or Lowes. They should be at most hardware stores. It should have 1 cm holes shaped like squares. First make the dome ( or bubble, whatever you want to call it) And make sure the cieling will be high enough. Then I make the floor so that I would be just a little bit bigger that the top of the tank. (maybe about 1/4 of a bigger on each side.) This way the bubble will fit better over the tank. Then, line up one side of the bubble to one side of the floor, leaving about three or four squares underneath so that the bubble will stay in place once complete. Now this is the part that takes a long time.... Take some wire that is very thin, but will be somewhat sturdy. I just used the wire that the wire mesh was wrapped in (it worked well!) tie the wire to one corner of the floor and begin to weave the bubble to the floor. Make sure it is very tight! It is kind of like sewing the two pieces together with the wire. Once this is done, Do the same thing to the other side of the bubble and floor. This next part is sort of tricky. You will need to cut a piece that will be big enough to cover up the whole at each end. (DON'T FORGET: Leave some extra wire at the bottom to that the bubble can stay on top of the tank!) Now, place the wire over the end so it covers the entire side. Then begin to weave the wire to hold it in place. AFTER all the wire is weaved through it, begin to trim off the extra wire mesh. Be careful when trimming off the extra wire mesh so it will not pull apart the weaved wire! Then repeat with the other end. When I was at this point, I noticed that the edges on the ends were very sharp. So what I did was I took some sand paper and I sanded down the edges. Then I put some duct tape on the OUTSIDE of this part so I would not get cut on it. Then I cut a small opening in the floor for a ramp and used a staple gun to staple a thin strip of the wire mesh to a piece of wood so they can climb up easier. Then I weaved the mesh that was attached to the board to the back of the oppening. In order to get the gerbils out I decided to cut a whole in the top, and make a little door using duct tape. Then I put a door on the side of the cage also. Now you are almost done! I then filed down all of the sharp edges that might hurt the gerbils while they are playing. (I really didn't have any because all of the sharp parts were on the outside.) Now you should be done!
Well, I hope you will be able to make this! I am very pleased with how mine turned out. The gerbils just love it!
|
|
|
|
Post by lpn1993 on Jan 14, 2005 19:11:05 GMT -8
Thanks a bunch for the instructions. My husband is going to help me make one of these for the top of my 10-gallon tank. I'm really excited about it! ;D
Thanks again!
|
|
|
|
Post by lpn1993 on Jan 19, 2005 7:20:33 GMT -8
We (hubby and I) got the tank topper made! I'm so excited! Here's a picture of it:  We're using it for our hamster, Ping, on the 10-gallon aquarium that the gerbils used to be in. (My gerbils are in a 20L aquarium now.) Thanks, Minnesota2121 and Paws, for the idea! |
|
|
|
Post by minnesota2121 on Jan 19, 2005 21:11:33 GMT -8
Looks great! Glad you were able to make it. ;D
|
|
|
|
Post by ecoa on Mar 16, 2005 18:47:36 GMT -8
THAT'S A COOOOL HOUSE. ;D
|
|

